Adding a new icon in a Visual Studio solution using the add-in
In relation to Axialis IconWorkshop, this article offers information on how to create a new icon in a solution and how to work on it in IconWorkshop using the Visual Studio plug-in (read the plug-in introduction).
Adding a new icon in the solution
1. Launch the Visual Studio IDE.
2. Open a solution. In the solution explorer, double-click on the resource file (extension .RC). The Resource Explorer opens.
3. The Resource View window opens. In the resource tree, right click on the Icon folder and choose "Insert Icon".
4. A new icon (say its name is "IDI_ICON1" and the icon filename is "icon1.ico") is added to the solution and automatically opened in a document window. It contains only 2 newly created formats 16x16 and 32x32 in 16 colors. Open it in IconWorkshop by choosing "Tools/Edit in IconWorkshop" or by clicking the associated button in the toolbar.
5. Once the file is opened in IconWorkshop, select "Draw/New Image Format" or press Ins. In this procedure, we'll make an icon fully compliant with Windows Vista but you can make icons using different specifications (read more about icons). In Colors select "RGB / Alpha Channel", in Size select "256x256 (Vista)".
6. As we want to make a Windows Vista icon, we'll compress the format in PNG: Select "PNG Compress 256x256 format". Be sure to leave the option "Creation based on the following image" unchecked. Click OK. The new 256x256 format is created.


7. Now you can do any icon by assembling available 256x256 image objects. For example, if you want to create document icons, we recommend you, in the Librarian, the folders "Objects/Samples/Large" and "Objects/Samples/File Types". In order to make things easier here, we'll start from an existing icon. What about a nice RSS icon? Ok, in the folder "Objects/Pack 4 - Web 2.0 Icons" (1), locate the file "RSS.png" (2). Add it to the project as we did in step 12 using drag & drop (3 & 4). The image is visible in the preview window (5):

8. Before going further, we must remove the 2 formats 32x32-16 and 16x16-16 originally created by Visual Studio. Right-click on them and choose "Remove Image Format" (the only format in the icon should be "256x256 - RGB/A").
9. Create all the following formats:
- 64x64 - RGB/A
- 48x48 - RGB/A
- 32x32 - RGB/A
- 16x16 - RGB/A
- 48x48 - 256 colors
- 32x32 - 256 colors
- 16x16 - 256 colors
- 32x32 - 16 colors
- 16x16 - 16 colors
10. When done, the icon document window should look like this:
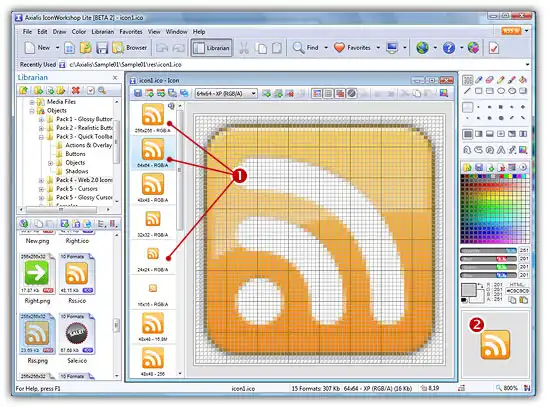
11. Click on the various formats 1 and see the resulting icon at scale 1:1 in the preview window 2. Note that the first image 256x256 RGB/A is PNG compressed because the small image ![]() is displayed in the upper-right corner.
is displayed in the upper-right corner.
12. Save your icon, select File/Save or press Ctrl+S. Close the document.
13. Switch back to Visual Studio. The IDE prompts you "icon1.ico - This file has been modified outside of Visual Studio. Do you want to reload it?". Click Yes.
24. You have finished. Now you can compile your project with your new icon embedded.