Create an animated cursor from a filmstrip
In relation to Axialis CursorWorkshop, this article offers information on the following topics:
- Opening the filmstrip file in Axialis CursorWorkshop
- Creating the animated cursor from this filmstrip image
- Setting the hot spot
In this tutorial, we'll see how to make an animated cursor from a filmstrip image in one simple procedure. A filmstrip is an image file containing several images placed next to each other. Each image is one frame of an animation. Filmstrips are just images so they can be saved using any image file formats such as BMP, GIF, JPEG 2000, JPEG and more.
Other methods are available to create animated cursors from existing documents. See the following topics:
- Create an animated cursor from an image
- Create an animated cursor from several images
- Create an animated cursor from an animated GIF
- Create an animated cursor from a FLI/FLC animation
- Create a rotating animated cursor from an image
Here is an example of a filmstrip containing 12 frames:

Opening the filmstrip file in Axialis CursorWorkshop
1. Choose "File/Open", browse your folders and select your filmstrip file (Windows standard dialog box).
or
Choose "File/New/File Browser" or press Ctrl+Alt+O. A built-in Axialis File Browser window opens. Browse your disks, see the thumbnail preview and double-click the filmstrip file you wish to open.
or
In the Recently Used zone (in the main toolbar), type the full pathname of the filmstrip file you wish to open then hit Enter.
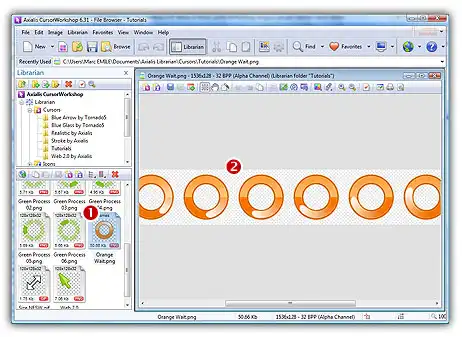
2. For example, open the file located in the librarian: "Cursors\Tutorials\Orange Wait.png" 1. The image file opens in a document window 2:
Note
Axialis CursorWorkshop will convert images to 32 bpp with transparency when possible, which is much more convenient to create cursors. The following image formats can include transparency: Photoshop PSD, PNG, RGB, GIF, JPEG 2000 and WMF.
Creating the animated cursor from this filmstrip image
3. If your filmstrip is opaque, you can create transparent areas. Using the following tutorial, you can easily transform the white background to transparency: Add Transparency to an Opaque Image.
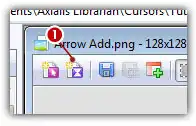
5. Choose Image/Create Animated Cursor from Selection or press "M" or click the associated button in the local toolbar 1:
6. The dialog box New Animated Cursor From a Filmstrip opens (see below). If Axialis CursorWorkshop does not detects this image as a filmstrip (width/height ratio must be integer), it will open a standard dialog "New Animated Cursor from Image". In such a case, click on the button "Image is a Filmstrip" and you'll get this dialog box:
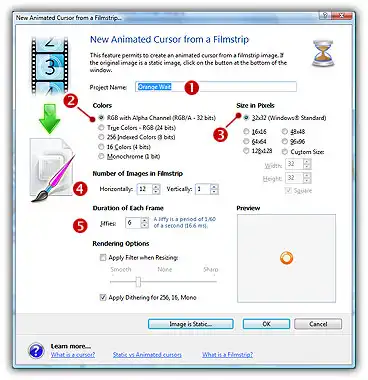
7. In the Project Name group 1, enter the cursor project name. Do not specify any extension. In Colors 2 and Size 3 groups, select the format of the animated cursor. To read more about the cursor specifications see What is a cursor topic. We recommend 32x32 RGB with Alpga Channel.
8. In Number of Images in Filmstrip 4, enter the number of frame images present horizontally and vertically in the filmstrip. Normally CursorWorkshop detects the correct values. If this is not the case, enter the correct value manually. The preview image will update accordingly.
9. In Duration of Each Frame 5, specify the display time of each frame in Jiffies (1/60 sec). For example, 6 Jiffies = 0.1 sec.
10. You can also apply a smooth/sharp filter to the final images.
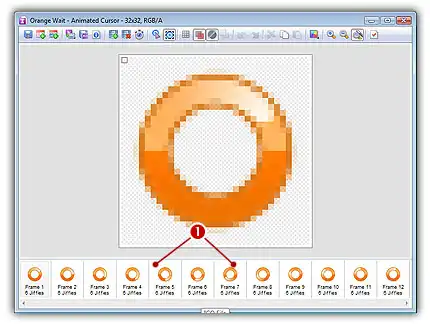
11. When done, click OK. The cursor is automatically created with all the frames 1:


The hot spot of a cursor is the point to which Windows refers in tracking the cursor's position. By default, the hot spot is set to the upper-left corner of the cursor (coordinates 0,0). But you can set the hot spot anywhere in the drawing area of the cursor (see What is a Cursor for more info).
1. Select the first format in the list. For example 32x32 RGB/A.
2. In the editor area, the hot spot is shown as a square slowly blinking from white to black. If you don't see the hot spot, activate the visualisation: choose Draw/Show Cursor Hot Spot or press Ctrl+K.
3. Select Draw/Set Cursor Hot Spot or press K. Click to the location of the hot spot..
4. The new location flashes for a short moment. The new hot spot location is now defined.