Modifying an icon in a Visual Studio solution using the add-in
In relation to Axialis IconWorkshop, this article offers information on how to modify an icon in a solution by opening it in IconWorkshop using the Visual Studio plug-in (read the plug-in introduction).
Modifying an icon in the solution using the plug-in
In this part, we'll see how to modify an icon included in a solution by transferring it in IconWorkshop with the plug-in. We'll use a C++ project using MFC. If you don't know C++ and MFC this is not a important since we won't work on the code. We'll only work on the icons and compile the solution.
1. Launch the Visual Studio IDE.
2. Open the solution.
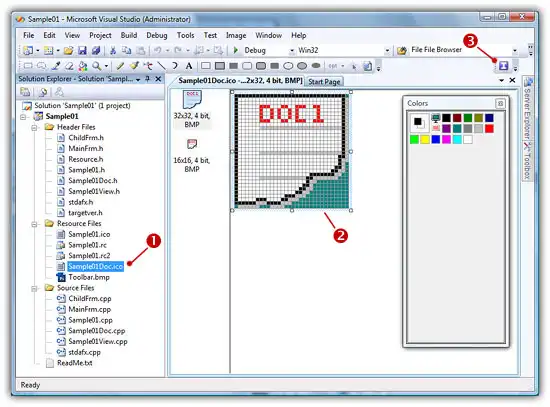
3. Say that the filename of the icon we want to modify is "Sample01Doc.ico". In the Solution Explorer window (press Ctrl+Alt+L if not visible), double click on the item "Sample01Doc.ico" (1). The icon file opens in a document window (2):

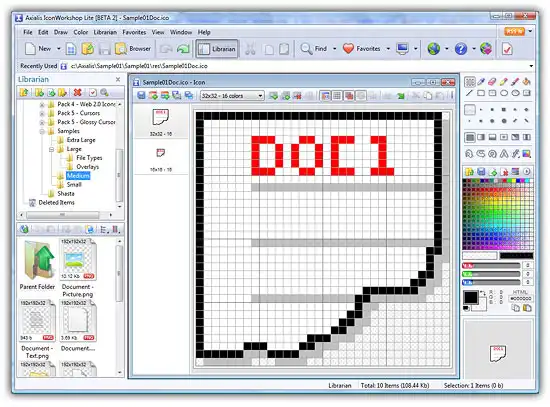
4. Launch the plug-in command by clicking on the button 3 or by choosing Tools/Edit in Axialis IconWorkshop. The icon is opened in IconWorkshop:

5. At this point, we could simply draw the icon as required. A better idea is to use the image objects to create a professional icon in a snap. We'll create a document window with a picture placed on it. The images formats we'll add in the icon will match the Windows XP requirements:
| 48x48 - RGB/A | 32x32 - RGB/A | 16x16 - RGB/A |
| 48x48 - 256c | 32x32 - 256c | 16x16 - 256c |
| 48x48 - 16c | 32x32 - 16c | 16x16 - 16c |
6. Create a new image format 48x48 - RGB/A. Choose Draw/New Image Format or press Ins.
7. A dialog box opens. In Colors, select "RGB/A Alpha Channel" and in Size in Pixels, select "48x48".
8. Uncheck the option "Creation Based on the Following Image".
Important
A new empty 48x48 image format is added at the top of the format list. If the image format is not empty, delete it and redo from step 9 and be sure to uncheck the option in step 11.
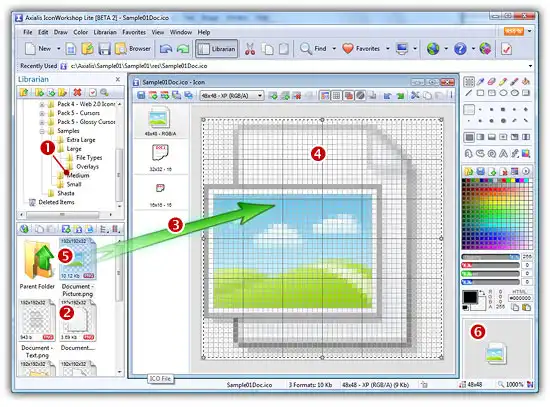
9. In the Librarian window (choose View/Librarian if it is not visible), select the "Objects/Samples/Medium" folder 1. A list of available object is displayed in the contents window below. Find the "Document.png" file and select it 2. When done, use a mouse Drag-and-Drop to add it into the project as shown below 3. The object is added to the project as a floating selection 4.

10. Find the "Document - Picture.png" file and select it 5 and redo the same operation to place it in the project 3. The final image should look as shown above in the preview 1:1 window (6).
11. Before going further, we must remove the 2 formats 32x32-16 and 16x16-16 originally created by Visual Studio. Right-click on them and choose "Remove Image Format" (the only format in the icon should be "48x48 - RGB/A")
Now let's add the other formats. We can do this simply by adding new formats from the existing one (48x48 - RGB/A).
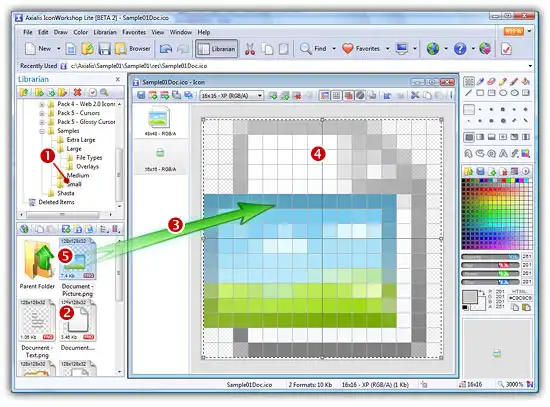
If you want create a professional icon, we recommend you to distinguish the images sizes 16x16 from the others. The 16x16 images must have less details and be more "crisp". See below the difference between a crisp 16x16 format and a normal one simply created from the 48x48 image:

12. Create a new empty format 16x16 as we did in step 9. Choose Draw/New Image Format or press Ins. In Colors, select "RGB/A Alpha Channel" and in Size, select "16x16". Be sure to uncheck the option "Creation Based on the Following Image". Click OK, the new format is added.
13. In the Librarian window (choose View/Librarian if it is not visible), select the "Objects/Samples/Small" folder 1. In this folder you find some objects suitable for 16x16 formats. Find the "Document.png" file and select it 2. When done, use a mouse Drag-and-Drop to add it into the project as shown below 3. The object is added to the project as a floating selection 4. Do the same for the image "Document - Picture.png" 5. The resulting icon project should look like this:

Now we can add the other formats from the 2 formats 16x16 and 48x48 we've just made. To do so, we'll use the following rules:
|
48x48 - RGB/A |
|
48x48 - 256 colors 48x48 - 16 colors 32x32 - RGB/A 32x32 - 256 colors 32x32 - 16 colors |
|
|
|
|
|
16x16 - RGB/A |
|
16x16 - 256 colors 16x16 - 16 colors |
14. Right-click on the format 48x48-RGBA in the list, a menu opens, choose "Create 32x32 RGB/A Image Format". The new format is created.
15. Redo the previous step for the remaining formats following this order:
• 48x48-RGBA -> choose "Create 48x48 256 Colors"
• 48x48-RGBA -> choose "Create 32x32 256 Colors"
• 16x16-RGBA -> choose "Create 16x16 256 Colors"
• 48x48-RGBA -> choose "Create 48x48 16 Colors"
• 48x48-RGBA -> choose "Create 32x32 16 Colors"
• 16x16-RGBA -> choose "Create 16x16 16 Colors"
16. The resulting icon should now look like shown below. As you can see, the 16-color versions are "pixelated". Even if these versions are rarely used on today's screens, we recommend to retouch them slightly: remove bad pixels and enhance borders with a darker color.

17. Save your icon, select File/Save or press Ctrl+S. Close the document.
18. Switch back to Visual Studio. The IDE prompts you "Sample01Doc.ico - This file has been modified outside of Visual Studio. Do you want to reload it?". Click Yes.
19. You have finished. Now you can compile your project.


