Create an Icon for your Screensaver using IconWorkshop
In relation to Axialis IconWorkshopand Axialis Screensaver Producer, this article offers information on the following topics:
- Create a Transparent Version of your Image (with Alpha Channel)
- Create the Icon using Axialis IconWorkshop
Axialis Professional Screen Saver Producer permits to create screensavers and customize the icons for the SCR file and the install package. That's a cool feature that permits to personalize your screensavers. But icons are not just images. They include transparency and several image formats to comply with Windows specs. To get more information on Icons, see this topic.
Fortunately, Axialis has created a tool that permits you to create professional icons in minutes: Axialis IconWorkshop. If you already have an image of the icon you wish to create, you'll be done in a few seconds! Learn how to create an icon from an image.
First of all, we need to create an image with a transparent background (much nicer result for an icon). This is in fact an image with an Alpha Channel embedded. It permits to create transparent areas, smooth borders and shades. We'll see how to create this transparent image using Photoshop and Paint Shop Pro.
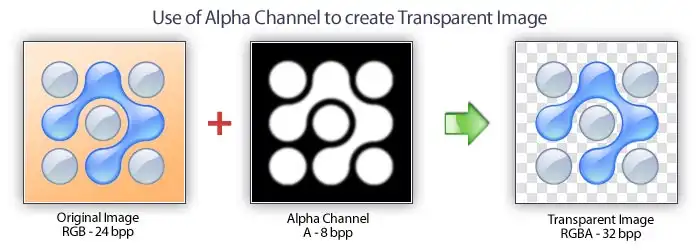
Alpha channels are masks through which you can display images. The alpha channel is an 8-bit channel, which means it has 256 levels of gray from 0 (black) to 255 (white). White acts as the visible area; black acts as the transparent area (you see the background behind the image when displayed). The level of gray in between determines the level of visibility. For example, 50 percent gray allows for 50 percent visibility. Alpha channels are usually used with 16.8M color RGB images. The resulting image is called RGBA (RGB+A, A means alpha channel).
In the illustration below you see how the alpha channel is applied to the original image to remove (visually) the orange gradient background. The result produces a 32 BPP (Bit Per Pixel) transparent image. The grey checkboard-like pattern shows the transparency of the image.
We recommend that you use a large image (300x300 is the perfect size). Keep in mind that an icon is a 16x16 to 48x48 image. It means that during the resizing operation, the details will be lost. Therefore, use a simple image without details like a company logo for example. In this tutorial, we'll use the Axialis Logo, which the perfect sample image.
Create a Transparent Version of your Image (with Alpha Channel)
If you want to learn how to create a transparent version of your image, please see one of the tutorials below using Photoshop and Paint Shop Pro. If you don't want to create a transparent icon or if your image is already transparent, go directly to step "Create the Icon using IconWorkshop".
- Create a Transparent Image using Adobe Photoshop
- Create a Transparent Image using JASC Paint Shop Pro
We recommend you to use a large image (300x300 is the perfect size). Keep in mind that an icon is a small image. It means that during the resizing operation, the details will be lost. Therefore, use a simple image without details like a company logo for example.


Create the Icon using Axialis IconWorkshop
1. Launch Axialis IconWorkshop application. Select File/Open..., browse your folders and select the transparent image file you've created above. Click OK. The file is opened in a document window:
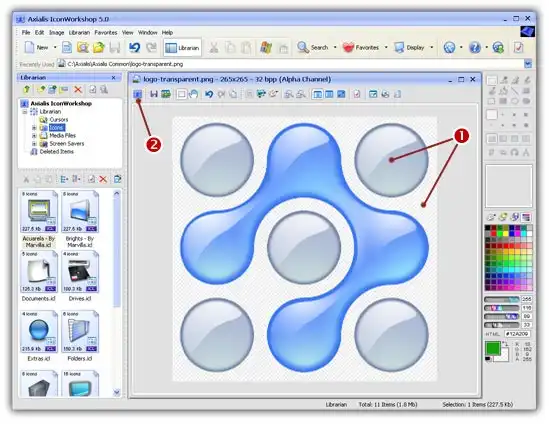
2. The image is centered in the document window with the transparent area shown as a checkboard pattern ( ).
).
3. Now let's create the icon. Select Image/Create Icon From Selection (I) or click the associated button in the local toolbar (2). A dialog box opens:
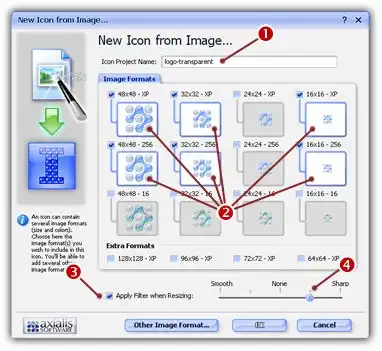
4. Enter a name for the new icon project ().
5. In the group Image Formats select the following formats (2):
![]() 48x48 - XP
48x48 - XP ![]() 32x32 - XP
32x32 - XP ![]() 16x16 - XP
16x16 - XP
![]() 48x48 - 256
48x48 - 256 ![]() 32x32 - 256
32x32 - 256 ![]() 16x16 - 256
16x16 - 256
6. To create a sharper icon (especially in small formats), you can apply a filter while resizing (3). Adjust Smooth / Sharp as needed (4).
7. Click OK. The icon is created and displayed in a new document window:

8. The selected icon image is displayed in the editor window (). All the requested image formats are present in the list on left (2). You can click on each format to display them in the editor area ().
9. Select File/Save and choose a location and a filename for ICO file. Click Save.
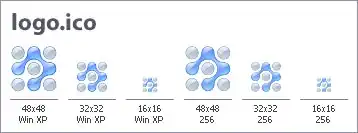
10. You're done! Congratulations! The icon file looks like this (snapshot made with Axialis IconWorkshop):
11. Now you can customize your screensaver with this brand new icon!