Create attractive cursors using image objects
In relation to Axialis CursorWorkshop, this article offers information on the following topics:
How to create attractive cursors? This is the question. The primary solution is to draw cursors using either an image or vector editor. Then, when the image is done, use Axialis CursorWorkshop to convert this image to a cursor. Also, if you don't want to use an external image editor, Axialis CursorWorkshop contains some drawing tools that permit you to draw your own cursors. But most of us are not graphic designers and we have a problem when it comes to create attractive cursors.
The question is: "How to create attractive custom cursors without drawing skills?" Image Objects are the answer.
The solution is to use a set of image objects already done by skilled computer graphic artists, and assemble them together to create a final artwork that will match your needs. Using a set of existing image objects the possibilities are almost infinite. You can create many different cursors or graphics simply by adjusting various parameters of each object like Hue (teint), Saturation, Brightess, Contrast, Size, Opacity and more.
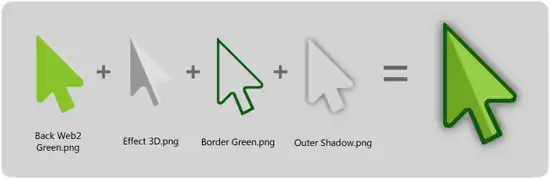
For example, using 4 objects from our object pack "Basic Cursors", you can easily create an attractive Web 2.0 arrow pointer:
This association can be easily done with Axialis CursorWorkshop using a few mouse clicks and drag-and-drops. Creating different versions of a cursor is very easy with this pack. See below some examples of the help cursor made in a few minutes simply using the mouse and without drawing one pixel (non-exhaustive list of course!):

Object Packs are libraries containing a large number of image objects made by a professional designer. We regularly publish new objects packs that you can download on Internet. To create your cursors, you just have to assemble basic objects together. To get more information on Image Objects and Packs, we recommend you to read these topics:
Note
To follow this tutorial, the object pack "Basic Cursors" must be installed in the librarian. Search the Librarian for the folder "Objects\Pack 7 - Basic Cursors. This pack is included in Axialis CursorWorkshop 6.31 or more. If you can't find the folder, download the pack from Axialis website.


In this first part we'll create a static pointer cursor. We'll start by making the 32x32 RGB/A image by assembling objects, then we'll make the other formats from this image.
1. Choose File/New/Static Cursor Project or press Ctrl+Alt+O. A dialog box opens:
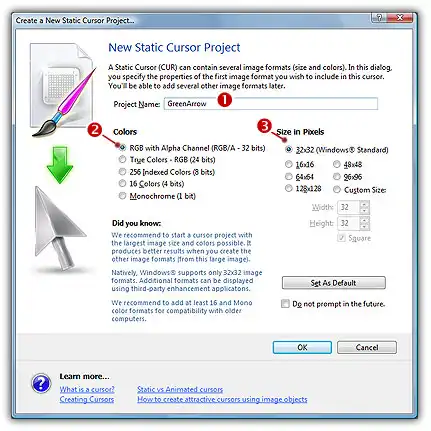
2. Type the name of the project 1: "GreenArrow".
3. Now specify the format of the first image to add in the project: In Color , choose "RGB with Alpha Channel (RGB/A 32 bits)" 2. In Size in Pixels , choose and "32x32 (Windows Standard)" 3.
4. When done, click OK. A new static cursor project window is created with the 32x32 format created.
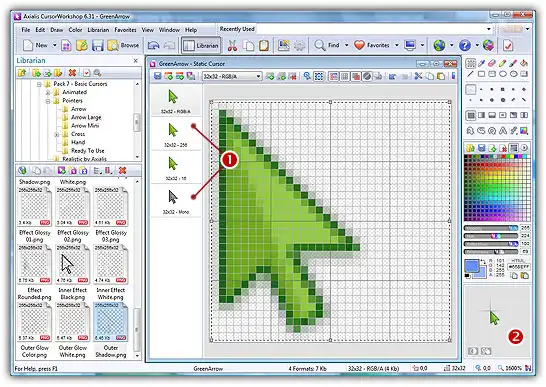
5. Now let's add the image objects. Before we start, don't forget that each step of the creation can be undone/redone (Ctrl+Z/Ctrl+Y) up to 16 steps back. In the Librarian window (choose View/Librarian if it is not visible), select the "Objects/Pack 7 - Basic Cursors/Pointers/Arrow Large" folder 1. A list of available object is displayed in the contents window below 2. Find the "Back Web2 Green.png" file and select it 3.
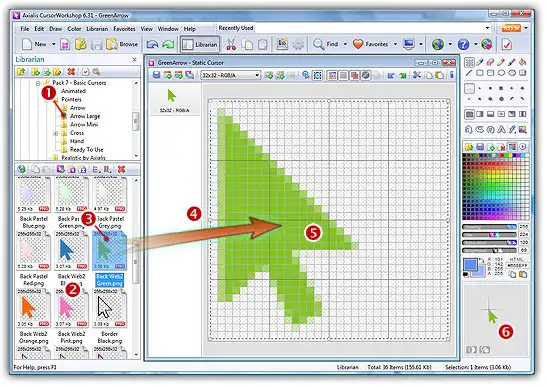
6. Use a mouse drag and drop to add it into the project as shown above 4. The object is added to the project as a floating selection 5. Take a look at the quality of the artwork in the Scale 1:1 window 6. You've just added your first image object to your project! As you can see it's very easy and intuitive. Now let's continue and add other objects to build the cursor.
Important
To follow the next steps, the "Preserve Transparency" option must be set (press "T" or select Draw/Preserve Transparency). If this option is not set, the transparency will not be kept each time you add a new image object and the objects already added will be fully replaced.
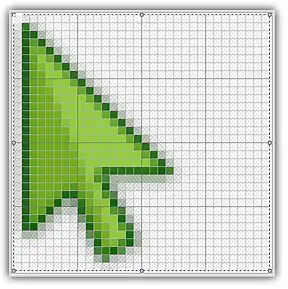
7. In the same folder, select the file "Effect 3D.png" and add it to the project using the same method. The resulting image now includes a 3D light effect as shown below:
8. Adding a border will increase the contrast and the visibility of the cursor. Select the file "Border Green.png" and add it to the project using the same method. The resulting image looks like below:
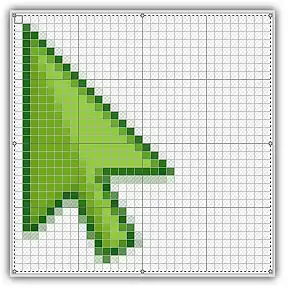
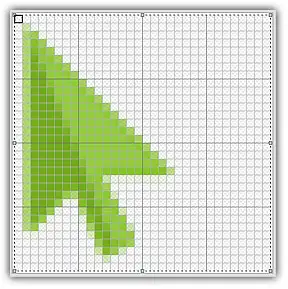
9. The result is good but we want to make it even better by adding an outer shadow. Select the file "Outer Shadow.png" and add it to the project. here is the final cursor image:
10. Now we must create the other formats from this one. Right-click on the 32x32 RGB/A image format in the list and choose "Add Several Image Formats from This Image". In the dialog box, select the following formats (click directly on the preview image):
![]() 32x32 - 256 Colors (1)
32x32 - 256 Colors (1)
![]() 32x32 - 16 Colors (2)
32x32 - 16 Colors (2)
![]() 32x32 - Monochrome (3)
32x32 - Monochrome (3)
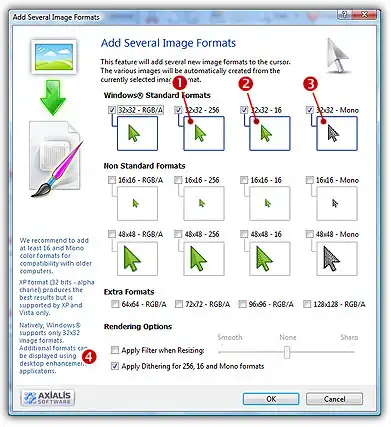
You can ignore (select or not) the 32x32 RGB/A image format already present in the image. You can also apply or not the dithering option to the 256/16 color images (try 4 and see the results in the preview images).
11. When done, click OK. The new formats are automatically created and added to the project 1:
10. The last operation is to set the hot spot. In the editor area, the hot spot is shown as a square slowly blinking from white to black. If you don't see the hot spot, activate the visualisation: choose Draw/Show Cursor Hot Spot or press Ctrl+K.
11. Select Draw/Set Cursor Hot Spot or press K. Click to the location of the hot spot. In our case, this is (1,1). The new location flashes for a short moment. The new hot spot location is now defined.
12. The animated cursor is now finished. We recommend to test it by using the "live test" button: ![]() .
.
13. Save your cursor: Choose File/Save (Ctrl+S) or add it to the Librarian (F3). It will be saved as Windows CUR format.
Congratulations! You've created your first cursor from Image Objects. There is no limit to your creativity using these objects. You can resize them, change their color, their opacity and more. You can even create your own objects by combining existing ones.
We can use similar techniques to create animated cursors. The drag & drop procedure will be similar but we'll be able to work on several frames simultaneously and work with animated filmstrip objects.
1. Choose File/New/Animated Cursor Project or press Ctrl+M. A dialog box opens:
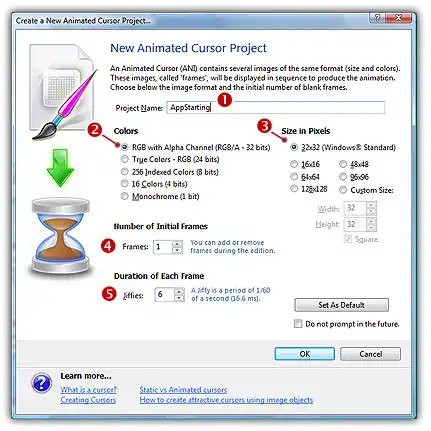
2. Type the name of the project 1: "AppStarting". Specify the format of the animated cursor: In Color , choose "RGB with Alpha Channel (RGB/A 32 bits)" 2. In Size in Pixels , choose and "32x32 (Windows Standard)" 3.
3. In Frames, specify "1". We'll start with one frame that we'll duplicate to create the non-animated portion of the cursor: the pointer. In Duration, specify "4". It means 4 jiffies = 4 x 1/60 sec = 66ms, which is perfect for the 12-frames cursor we want to create.
4. When done, click OK. A new animated cursor project window is created with the first frame added.
5. Now let's create the non-animated portion of the cursor: the mouse pointer. In the Librarian window (choose View/Librarian if it is not visible), select the "Objects/Pack 7 - Basic Cursors/Web 2.0 by Axialis" folder 1. A list of available object is displayed in the contents window below 2. Find the "Arrow.png" file and select it 3.
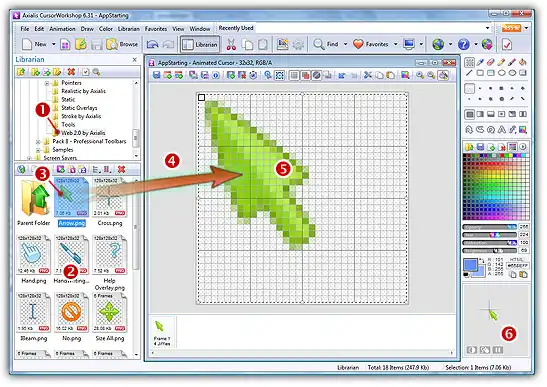
6. Use a mouse drag and drop to add it into the project 4. The object is added to the project as a floating selection 5.
Important
To follow the next steps, the "Preserve Transparency" option must be set (press "T" or select Draw/Preserve Transparency). If this option is not set, the transparency will not be kept each time you add a new image object and the objects already added will be fully replaced.
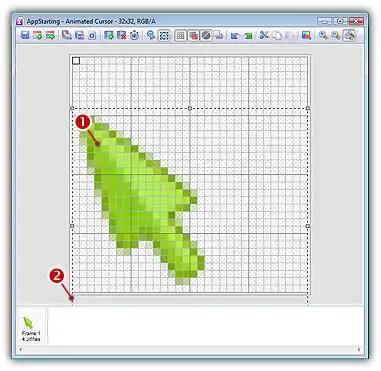
7. We need to move the existing drawing 3 pixels down to free space for the animation in the upper-right corner of the cursor. Using the down arrow key, hit 7 times to move the drawing 7 pixels down. The pointer drawing has moved down 1 and the selection square has moved outside of the drawing area 2, which is perfectly normal:
8. The first frame with the static partion of the cursor is created. Let's duplicate this frame to create 12 identical frames. Choose Animation/Add New Frames or press "Ins". A dialog box opens:

9. In Number of Frames 1, specify "11" since this is the number of frames to add. In Location, select "Insert After current frame" 2. Select the option "Duplicate Current Frame" 3 in order to create new frames containing copies of the initial image. In Jiffies, keep the value "4". Click OK, the 11 new frames are added to the animation.
10. Now, let's add the animated wait image in the upper-right corner. Before doing this me must inform CursorWorkshop "where" we want to add the next image object: In the upper-right corner of the cursor (not over the whole area) AND in the 12 frames (not only the selected one).
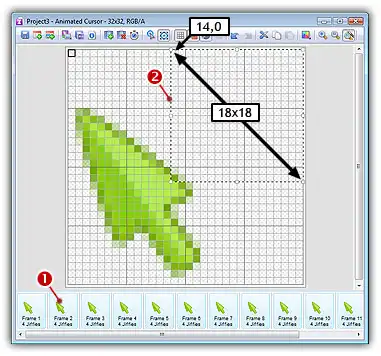
11. First, let's select the 12 frames: Click in the list of frames (at the bottom of the editor window) and choose Animation/Select All Frames or right-click and choose the command in the context menu. All the frames should be marked as selected 1. Be sure that all the 12 frames are selected (see status bar). Then, using the selection tool 1, select a square portion of the image in the top-right corner from (14,0) with size 18x18 2:
12. In the Librarian window, folder "Objects/Pack 7 - Basic Cursors/Web 2.0 by Axialis" 1, find the file "Wait Large Torus Bold.png" and select it 3. Use a mouse drag and drop to add it into the project 4.
13. You're prompted by CursorWorkshop "Duplicate the Object on Selected Frames?". Click YES.
14. The object is added to the project as a floating selection 5 in all frames 6:
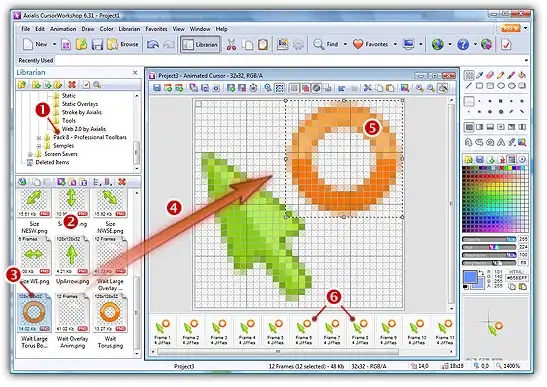
15. Without removing the selections, redo the drag & drop operation with file "Wait Large Overlay Anim.png" 1. This file is an animated filmstrip composed of 12 images placed next to each other horizontally in a large bitmap. This type of file is automatically recognized by CursorWorkshop as an animation and during the drag & drop, one different image is added in each frame 2. You see the resulting animation in the Preview 1:1 window 3:

16. The last step is to set the hot spot. Select Draw/Set Cursor Hot Spot or press K. Click to the location of the hot spot. In our case, this is (1,8). The new hot spot location is now defined.
17. The animated cursor is now finished. We recommend to test it by using the "live test" button: ![]() .
.
18. Save your cursor: Choose File/Save (Ctrl+S) or add it to the Librarian (F3). It will be saved as Windows ANI format.