Create illustration icons for websites
In relation to Axialis IconWorkshop, this article offers information on the following topics:
In this tutorial, we'll see how to create illustration icons for web sites. If you're a webmaster, you frequently need to illustrate your sites with images. IconWorkshop permits creating images in GIF formats suitable for inclusion in HTML pages from object packs in a snap.
Creating a new illustration icon for a website
Remark: To follow the procedure below, you need the object pack #5 "Web Illustrations": Download Image Object Pack #5 - Web Illustrations
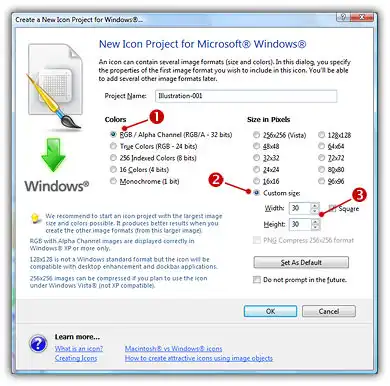
1. Choose File/New/Icon Windows Icon Project, a dialog box opens. In Name, type for example "Illustration-001". In Colors, choose "RGB / Alpha Channel" 1. We'll reduce the color palette during the conversion to GIF later. In Size in Pixels, click "Custom Size" 2 and specify 30x30 in the fields Width/Height 3. This is just an example, you can enter the size you want here (less than 128x128 for best results with the object packs we'll use). Click OK, the blank icon is created.
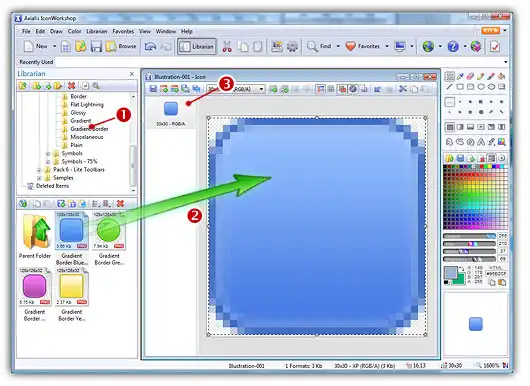
2. In the Librarian, open the folder "Objects\Pack 5 - Web Illustrations\Background Bases\Gradient Border" 1. Select the object "Gradient Border Blue Rounded.png" 2 and using drag & drop, add it to the icon editor. The icon is updated in the editor area and in the format list 3:
4. Select folder "Objects\Pack 5 - Web Illustrations\Symbols". Select the object "Email.png" and using drag & drop, add it to the icon editor. The resulting icon should look like this:
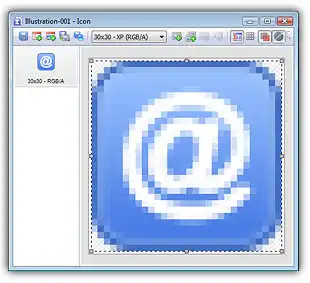
Don't save this icon by a simple File/Save because the file format will be ICO, which is useless for web sites. We'll rather export the current image as GIF with web optimization.
5. Choose File/Export/Compuserve GIF, a dialog box opens:
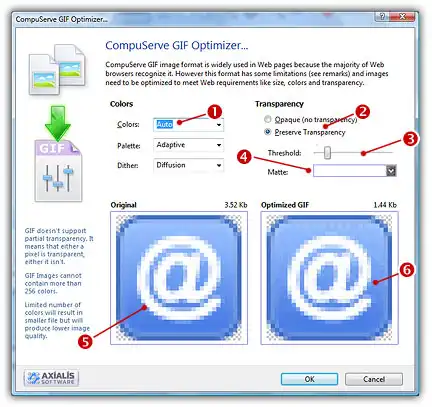
6. In Colors 1, specify the number of colors you wish to use in the image palette. Limited number of colors will result in smaller file but will produce lower image quality. Choose "Auto" if you're not sure about desired the number of colors. In Palette, choose the type of palette desired: Adaptive (the palette will be calculated to get the best results possible - recommended), Web Safe (Netscape Web palette), Windows (default palette used under Windows), Macintosh OS (default palette used under MacOS in 256 color screen mode). In Dither, choose "Diffusion" if you want IconWorkshop to simulate colors not present in the palette by pixel mixing using the "error diffusion" method (this produces the best results but usually creates slightly larger files).
7. In Transparency, select "Preserve Transparency" 2. Threshold and Matte are the important settings to make a professional GIF image. First, select in Matte 4 the approximate color of the page background where the icon will be displayed. As the GIF format does not support smooth transparency, this will limit the "halo" and "aliasing" effect around the icon. In Threshold 3, adjust the level of the transparency frontier around the icon. You see the preview in the box below while you adjust the slider. We recommend to adjust it arround 25% for good results.
8. While you adjust the settings, the preview picture is updated 6. You can compare it with the original image 5. When done, click OK, choose a filename and location. You're done, the GIF file is created and ready for use in your web page.
Creating several illustration images in batch mode
Using the object packs that we release on regular basis, you can create a large number of icons. Some packs, like the "Pack #5 - Web Illustration", permit creating a list of icons by merging different symbols over the same background base. This is called a "batch merging" procedure. This is useful when you must create several button icons of the same style for a web site.
1. In the Librarian, open the folder "Objects\Pack 5 - Web Illustrations\Background Bases\Plain". Right-click on the file "Plain Vivid Orange Rounded.png" and choose Copy Pathname. This will copy the full pathname of the file in the clipboard. This is the base we'll use to create our list of symbols. We'll need this full pathname in a moment.
2. Open the folder "Objects\Pack 5 - Web Illustrations\Symbols" 1. Right-click in the file list 2 and choose Open Folder in File Browser. A new File Browser window opens, displaying the contents of the folder 3.
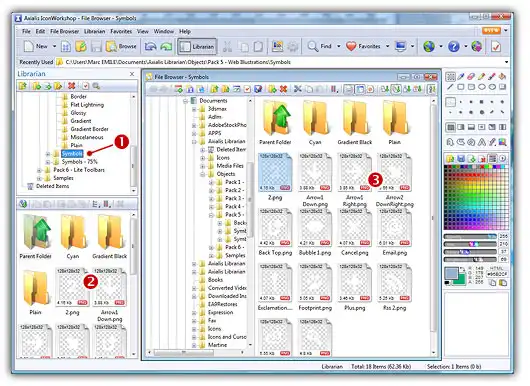
3. Select all the files by pressing Ctrl+A. Right click in the selection and choose Batch Merge Images (PNG, PSD, PNG, GIF). A dialog box opens:
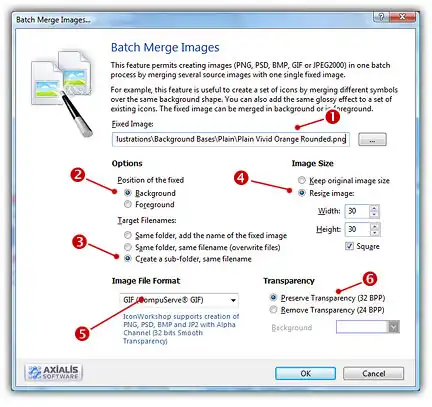
In Fixed Image, right-click and choose Paste. The full pathname of the file we copied in step 1 is pasted 1. In Options, select Background 2 and Create a Sub-folder, same filename 3. This will place the base in background and create the nnew files in a subfolder. In Image Size, select Resize Image 4 and specify 30x30. In Image File Format, select GIF (compuserve) 5. The last option is Transparency 6: select Preserve transparency.
4. Click OK. A GIF optimization dialog box opens. Specify the desired options as we've seen in the previous tutorial, Click OK. The batch procedure starts.
5. When finished, a new subfolder named "Plain Vivid Orange Rounded" is created. Double click on it to show its contents. All the GIF files that have been created by the batch procedure are displayed. Here is a snapshop of the resulting images:

The full version of the Object Pack #5 - Web Illustration contains more than 205 objects in 2 sizes, 5 colors and hundreds of background bases. The possibilities are almost infinite!


