Convert a Windows Icon to Macintosh
In relation to Axialis IconWorkshop, this article offers information on the following topics:
- What are the differences between Windows and Macintosh icons?
- Which image formats are included in Macintosh icons?
- Convert the icon to Macintosh, keeping all compatible image formats
- Creating a Macintosh icon from a Windows icon
- Where to find Windows icons?
What's the difference between Windows and Macintosh icons?
Microsoft Windows and Apple Macintosh icons are very similar. They both have several image formats embedded in the same icon. But the file format is totally different. You cannot use Macintosh icons under Windows because the file format is not compatible. You must convert them to Windows ICO file format (with IconWorkshop of course!).
All kinds of formats can be included in a Windows ICO file (you can even create non-square icons). With Macintosh icon files this is not possible. Only some strictly-defined image formats can be included.
Axialis IconWorkshop supports the following Macintosh icon files: ICNS, RSC and BIN. Icons from system 7.5, 8.5, 9.x and 10.X are supported. You can easily open them into the Icon Editor and save them as Windows ICO format. During this operation, we recommend you to remove special Macintosh formats which are useless under Windows.
To learn more about Windows and Macintosh icon file formats, read this topic: Macintosh vs Windows icons
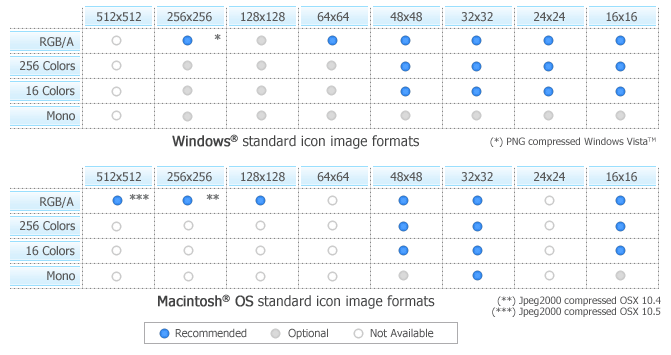
Which image formats are included in Macintosh icons?
Here is the list of image formats you can find in Macintosh Icons:
- Leopard (512x512) - 32 bits (alpha channel)
- Tiger (256x256) - 32 bits (alpha channel)
- Thumbnail (128x128) - 32 bits (alpha channel)
- Huge (48x48) - 32 bits (alpha channel), 256 colors, 16 colors, mono
- Large (32x32) - 32 bits (alpha channel), 256 colors, 16 colors, mono
- Small (16x16) - 32 bits (alpha channel), 256 colors, 16 colors, mono
- Mini (16x12) - 256 colors, 16 colors, mono
The new OS-X icons can contain very large image formats (128x128, 256x256 - 32 bits). Those formats are also supported. Although those image sizes are not actually used in Windows, it's a good idea to start from hi-res sizes to create a new Windows icon.
Here is a summary of image formats you can find in Macintosh and Windows Icons:


Convert the icon to Macintosh, keeping all compatible image formats
This is the simplest way to proceed. All the Windows image formats may not be copied because the Macintosh icon file format is not open (only the Macintosh formats as specified above are supported). For example, the 24x24 image format is not supported in Macintosh icons.
1. Open the Windows icon. Choose File/Open... The icon is opened in a document window.
2. Choose File/Save As, select Macintosh (ICNS, RSC or BIN) as file type and specify a new name.
- or -
2. Choose File/Save As Macintosh Icon... (Ctrl+Alt+S) and specify a new name.
- or -
2. Click the following button on the toolbar and choose a new name for this icon.

Creating a Macintosh icon from a Windows icon
This operation is not a conversion, it's a creation of a new icon. It will not preserve all the existing formats. It will create a new icon based on the largest and most coloured image included in the original Windows icon (usually 256x256, 128x128 or 48x48 with alpha channel).
1. Open the Windows icon. Choose File/Open...
2. When the icon is opened, select the largest and the "most coloured" image format in the list (best with 256x256, 128x128 or 48x48 with alpha channel).
3. Right-click on the selected image format in the list 1, a menu opens. Select "New Macintosh Icon Project from this Image..." 2.
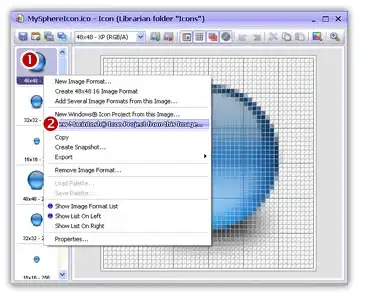
4. A large dialog box opens. In the Name group 1, enter the icon project name. Do not specify any extension.

5. In the Image Formats group, select the image formats you whish to add in the icon (1 2 3 4).
6. You can also add other formats (256x256 to be used in Tiger). When done, click OK. The new Icon Project document window is created with all formats embedded.
7. Save your icon to Macintosh format. choose File/Save and choose a new name (.ICO) for this icon.
Many websites offer various Windows icons package for download. Try to search using Google or Yahoo for the following terms: