Batch Create Icons From Images, Cursors
In relation to Axialis IconWorkshop, this article offers information on the following topics:
Using this feature you can Create Several Icons from images, Icons (Macintosh/Windows) or Cursors in one operation. This is what we call a batch procedure. We'll perform this task using the built-in IconWorkshop explorer.
Select the Source Images, Icons or Cursors
1. Open a new Explorer window. Choose File/New/File Explorer..
2. When the window is opened, select the folder which contains the Source Files using the tree in the left pane.
3. When done, the Source Files appears (with preview) in the right pane. Select the icons you wish to convert. You can use Shift/Ctrl + Mouse to select several icons. Use Ctrl+A to select all. Use +/- to select/unselect by specifying filters.


Batch create Windows icons
4. Choose Explorer/Batch Create Windows Icons from Selection or Ctrl+Shift+C.
5. A dialog box opens. In "Standard Image Formats" 1 and "Extra Image Formats" 2 choose the image formats you wish to add in the icons.
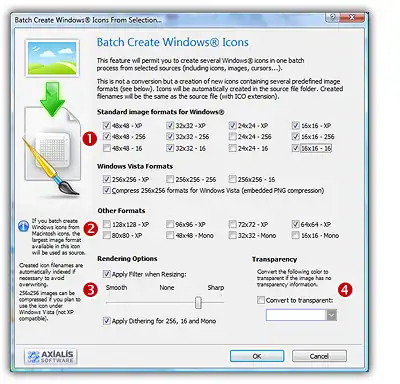
6. In Image Adjustment group 3, you can add a smooth or sharp filter to the image shrinking process. You can also use or not a dithering method to render image using 256 or 16 colors. In Transparency group 4, an option permits to use opaque images (i.e. without transparency) and specify a color to make transparent.
7. When done, click OK. The batch operation starts immediately, the hourglass mouse pointer is displayed during the creation. When done the new Windows icons are added to the folder contents.
Batch create Macintosh icons
4. Choose Explorer/Batch Create Macintosh Icons from Selection or Ctrl+Shift+D.
5. A dialog box opens. First we need to choose the Macintosh file format 1 we wish to use (there are 3 formats supported by IconWorkshop - see this topic to learn more).
6. A dialog box opens. In "Standard Image Formats" 2 and "Extra Image Formats" 3 choose the image formats you wish to add in the icons.
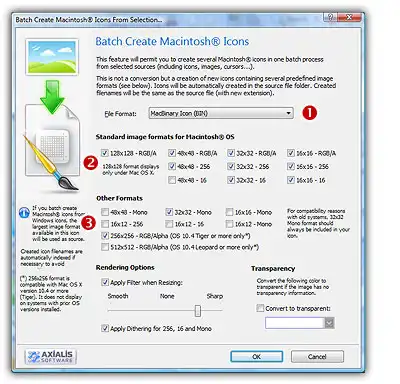
7. In Image Adjustment group, you can add a smooth or sharp filter to the image shrinking process. You can also use or not a dithering method to render image using 256 or 16 colors. In Transparency group, an option permits to use opaque images (i.e. without transparency) and specify a color to make transparent.
8. When done, click OK. The batch operation starts immediately, the hourglass mouse pointer is displayed during the creation. When done the new Windows icons are added to the folder contents.
The created icons have the same filename as the original document with different extension (depending on the icon types). A system has been implemented to index the files if necessary to avoid overwriting.
If you create icons from Image Files, the whole image is selected and resized keeping its aspect ratio. If it contains transparency, it is kept during the creation.
If you create icons from an Existing Icons or Cursors, the largest image is used as source to create the icons. Transparency is kept.