Use CursorWorkshop with Adobe Photoshop
This article provides information on the following topics:
• Why a Photoshop plug-in for Axialis CursorWorkshop?
• Transfer an Image from Photoshop to CursorWorkshop
• Transfer a Cursor Image from CursorWorkshop to Photoshop
• Install the Photoshop transfer plug-in
• Transfer an Image from Photoshop with the plug-in
A plug-in is a program extension module. In fact, this is a small program which is "plugged" (added) into another application to enhance it or add a new feature to it. The plug-in must be compatible with the "parent" application specifications.
Adobe created a powerful plug-in interface for Photoshop. This plug-in model is now a widely used standard in the graphical industry. As a result, a Photoshop compatible plug-in can also be used with various other graphical applications (Illustrator, Paint Shop Pro...).
Why a Photoshop plug-in for Axialis CursorWorkshop?
We created such a plug-in to permit you to transfer an image or a drawing directly from Photoshop (or any plug-in compatible application) to Axialis CursorWorkshop through the memory. This is much more fast and secure. No more temporary PSD or PNG file to transfer your image into Axialis CursorWorkshop. No more risk to loose your file while transferring it.
Before using this plug-in you have to install it in the Photoshop plug-ins directory.
Transferring an Image from Photoshop to CursorWorkshop to Create a Cursor
1. Axialis CursorWorkshop supports the native Photoshop PSD image format with Layers. In Photoshop save your image to a PSD file.
2. In CursorWorkshop, choose "File/Open", browse your folders and select your file (Windowsstandard dialog box).
or
Choose "File/New/File Browser" or press Ctrl+Alt+O. A built-in Axialis File Browser window opens. Browse your disks, see the thumbnail preview and double-click the image file you wish to open.
or
In the Recently Used zone (in the main toolbar), type the full pathname of the image file you wish to open then hit Enter.
3. The image file opens in a document window. If the image contains layers, you see them on the left side of the document window. You can select one layer by clicking on it. Its contents appears automatically in the main area. Now you can create a static cursor from this image or create an animated cursor from this image.
Transferring a Cursor Image from CursorWorkshop to Photoshop
1. Open an cursor in CursorWorkshop. Select the desired image format by clicking on it. It appears in the editor window.
2. Choose Draw/Save Image as Bitmap. A dialog box opens. Choose to Preserve Transparency Information (this will permit you to keep transparent areas in your PSD image file). When done, click OK.
3. A standard Save Image As dialog box opens. In the Save as Type list, select "Adobe Photoshop (PSD)". Choose a destination folder and type a new filename. When done, click OK. The file has been created.
4. In Photoshop, open the newly created file. It opens, containing one layer with transparency. Now you can retouch it or use it as necessary.
Install the Photoshop-CursorWorkshop transfer plug-in
Before using the plug-in as detailed in next topic, you need to install it on your computer. The plug-in can be easily installed from within Axialis CursorWorkshopä in one fast and simple operation.
1. Before installing the plug-in we recommend you to close the Photoshop application (if it is actually opened in background). Choose File/Install Photoshop Plug-in...
2. The dialog
box Install the Photoshop to CursorWorkshopTransfer Plug-in opens
(see below). In the Location edit
zone (![]() ), specify the Photoshop plug-in folder. If you don't
know the exact folder path, click the browse button (
), specify the Photoshop plug-in folder. If you don't
know the exact folder path, click the browse button (![]() )
to choose the folder in a list.
)
to choose the folder in a list.
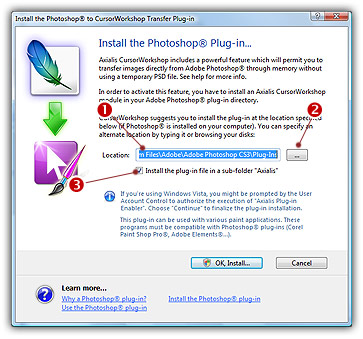
3. If you want
to create a subfolder "Axialis"
to install the plug-in module (recommended to organize your folder properly),
activate the option "Install in
a subfolder Axialis" (![]() ). Note that creating
a subfolder may fail with some compatible applications.
). Note that creating
a subfolder may fail with some compatible applications.
4. Click OK. When done, a message informs you that the plug-in has been installed.
5. Now you can start your Photoshop application. The plug-in is visible in File/Export/Export to Axialis CursorWorkshop menus.
Transferring an Image from Photoshop to CursorWorkshop using the plug-in
1. First of all, launch Photoshop and open or create an image file. You don't need to launch Axialis CursorWorkshopbefore using the plug-in. It will be automatically launched by the plug-in if necessary.
2. For example, open the file located in the Librarian "Cursors\Tutorials\Web2 Arrow Add.psd".
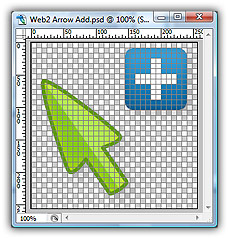
3. Export the image: Choose the File/Export/Export to Axialis CursorWorkshop in the Photoshop menu.
4. Axialis CursorWorkshop is automatically launched (or activated if running in background) and the dialog box Transfer from Adobe Plug-in opens:
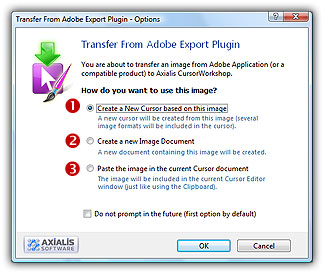
5. The image
is about to be transferred in Axialis CursorWorkshop.
You can choose one of the following operations: Create
a New Cursor using this Image (![]() ): You create a new
cursor with several formats based on the image (see step 4); Create
a New Image Document (
): You create a new
cursor with several formats based on the image (see step 4); Create
a New Image Document (![]() ): CursorWorkshop
opens a new document containing the image. You'll be able to perform various
operations on the image (resize, crop, save...) and even create a new
cursor from a portion of it; Paste the
Image in the Current Cursor Document (
): CursorWorkshop
opens a new document containing the image. You'll be able to perform various
operations on the image (resize, crop, save...) and even create a new
cursor from a portion of it; Paste the
Image in the Current Cursor Document (![]() ): This option
is enabled only if a cursor document is already opened in CursorWorkshop. It pastes the image in the
current editor area (just like the Clipboard paste operation).
): This option
is enabled only if a cursor document is already opened in CursorWorkshop. It pastes the image in the
current editor area (just like the Clipboard paste operation).
6. If you choose
the first option (Create a New Cursor using
this Image), the following dialog
box opens (see below). As Axialis CursorWorkshop
support creation of both Windows and animated cursors, you're prompted
to choose the format. Select option ![]() for a Static Cursor or option
for a Static Cursor or option
![]() for an Animated Cursor.
for an Animated Cursor.
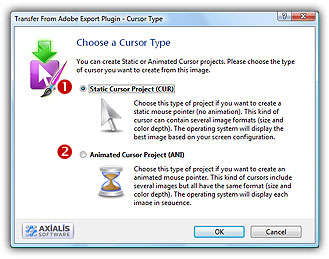
7. If you choose Static Cursor Project (CUR), the following dialog box opens. The procedure is similar for creating Animated Cursors.
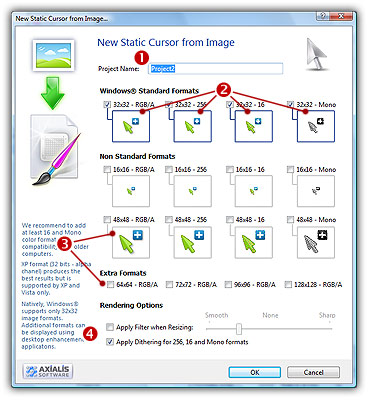
8. In Project Name (![]() ) specify the name of the new cursor that will be created.
) specify the name of the new cursor that will be created.
9. Select the image formats to add in the cursor. If you create a standard Windows cursor, add the following formats (![]() ):
):
![]() 32x32 - RGB/A
32x32 - RGB/A
![]() 32x32 - 256 colors
32x32 - 256 colors
![]() 32x32 - 16 colors
32x32 - 16 colors
![]() 32x32 - Mono
32x32 - Mono
10. You can add other non-standard formats (![]() ) but they won't be used by current versions of Windows (these formats might be useful in future versions of Windows). You can also apply or not the dithering option to the
256/16 color images as well as add a filter effect to smooth/sharpen the
resulting images in RGB/A mode (try
) but they won't be used by current versions of Windows (these formats might be useful in future versions of Windows). You can also apply or not the dithering option to the
256/16 color images as well as add a filter effect to smooth/sharpen the
resulting images in RGB/A mode (try ![]() and see the results
in the preview images).
and see the results
in the preview images).
11. When done,
click OK. The cursor is automatically
created with the various image formats you've chosen. You can click on
the various image formats you've created (![]() ) to see the results
in the editor window. The automatic color reduction and smooth transparency conversion generally create a few pixel iregularity that need to be manually retouched. If necessary, do it using the available tools.
) to see the results
in the editor window. The automatic color reduction and smooth transparency conversion generally create a few pixel iregularity that need to be manually retouched. If necessary, do it using the available tools.
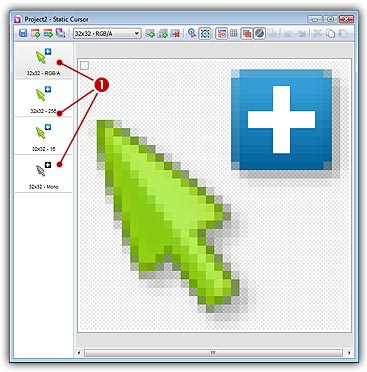
12. The last step is to set the hot spot. Choose Draw/Set Cursor Hot Spot or press K and click on the hot spot location.