What is a Cursor?
In relation to Axialis CursorWorkshop, this article offers information on the following topics:
- Overview
- Did you say "Cursor"?
- Why creating cursors?
- What are the differences between an image and a cursor?
- What is the RGB format with Alpha Channel?
- Specifications of Static Cursors
- Specifications of Animated Cursors
- What is the Hot Spot?
- Can we save several cursors into one file?
When you use a computer which has a graphical user interface, the operating system uses a cursor to show the current position of the mouse pointer. A cursor is a graphical image that usually represents an object illustrating the operation that can be performed by the mouse action.
In its normal state the cursor is a simple arrow. However, when you move the mouse pointer over the screen, the cursor may change with the context. For example, when the pointer moves over an internet link it changes into a hand, indicating that the user can "click" the link (see illustration below):
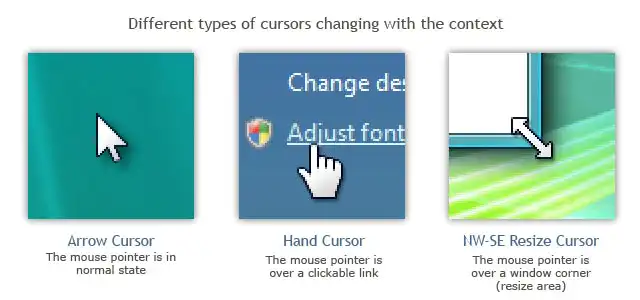
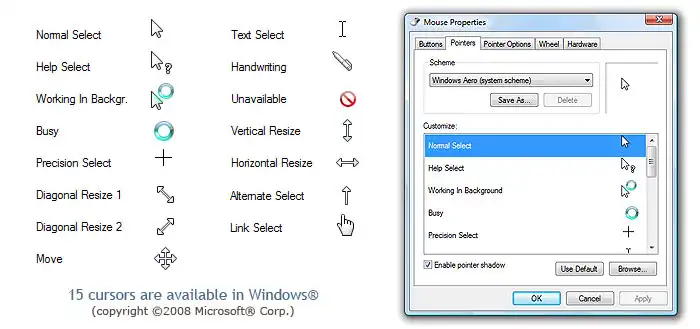
Microsoft Windows supports up to 15 different cursors that are displayed in different context (Normal Select, Help Select, Working in background, Busy...). These different cursors can be customized through the Windows control panel:
To illustrate mouse actions, applications can use Windows cursors or use their own custom cursors. In this last case the developper must create its cursors and include them in the application (embedded in the EXE or DLL program file). For example, Axialis CursorWorkshop contains several custom cursors that are used to illustrate drawing tools.
A cursor (static or animated) contains a "Hot Spot". This is used to specifying the position of the cursor on screen when it will act as the mouse pointer. Read this topic below to learn more.
Cursors can be designed at different sizes and color depths:
- Sizes: You can create cursors from size 8x8 to 256x256 pixels (see remark below).
- Color Depths: The following color depths are supported in cursors:
- 1 BBP: Monochrome, hard transparency
- 4 BBP: 16 colors with fixed palette, hard transparency
- 8 BBP: 256 colors with custom palette, hard transparency
- 24 BBP: RGB true colors, hard transparency
- 32 BBP: RGB True colors, smooth transparency (alpha channel) - Supported by Windows XP, Vista and superior only
Important
Current versions of Windows support only 32x32 cursors. If you create larger or smaller cursors, they'll be automatically resized to 32x32 by Windows. However, because of new High-DPI screens, future versions of Windows will probably support larger cursor sizes.
Two types of cursors are supported by Windows: Static cursors (extension .CUR) and Animated cursors (extension .ANI). Their structures and file formats are different. Axialis CursorWorkshop fully supports creation and edition of these two types of cursors.
Did you say "Cursor"?
Originally, a cursor is a blinking vertical bar used to indicate a position in a text where the user is inserting characters. This is the case in word processors for example.
With the first graphical user interfaces, the mouse was created and its pointer on screen. A new object was created that needed to be named. No official name was given by the computing community. Some people named it "Pointer" or "Mouse Pointer", other people named it "Cursor". The latter is not necessary the best choice because it adds confusion with the blinking vertical bar.
However, it seems that the following names are now used:
- The "Pointer" or "Mouse Pointer": It is the graphical object that moves on screen. It can be static or animated.
- The "Cursor": It is the file or the memory block used to encode and save the animated (ANI) or static (CUR) graphical object.
In Axialis CursorWorkshop product and its documentation, we use "Cursors" to name the graphical objects that we create/edit/save. We only use "Mouse Pointer" when we refer to the final object in usage in Windows once associated to the mouse movements.
Why creating cursors?
There are various reasons to create cursors:
- 1. Customizing Windows - Create your own cursors (animated or static) and save them in the folder Windows\Cursors. Open the Windows control panel and change the 15 standard cursors accordingly.
- 2. Add cursors in your applications - If you're a developper, you'll appreciate the ability to create your own cursors and include them in your application's resources. The Windows SDK explains in details how to load and use them in your application.
- 3. Use custom animated cursors in websites - If you have a website or a blog, customize your pages with static or animated cursors of your own.
Axialis CursorWorkshop
Make Static & Animated Cursors for Windows
![]()
Make your own cursors for Windows and web sites
Create professional-looking static and animated cursors to customize mouse pointers in Windows, applications and web sites.
Create animated cursors from GIF, FLI/FLC, filmstrip animations
Several built-in assistant permits creating animated cursors from existing animation files such as animated GIF, FLI/FLC Autodesk animations, RGB filmstrips with alpha channel and more.
Work efficiently with industry standards
Use plug-ins for Adobe Photoshop and Illustrator and make your cursors in a few clicks.


What are the differences between an image and a cursor?
A computer image is a bitmap (composed of pixels) or a vector (composed of drawing paths) object, which can be saved using various file formats (BMP, PSD, GIF, JPEG, WMF...). All these formats have several different properties (bitmaps, vectors, compressed, layered, animated...) and can be used to store images at any sizes and resolution.
Cursors are different from standard images. They have several images embedded in the same file. Static cursors usually contain different images of the same object at different size and/or colors. Animated cursors contain a serie of images of the same size and same color format. Each image is a frame of the final animation.
Another property of a cursor is the ability to include transparent areas in the images. This allows seeing the screen background behind the cursor within its square image. Image formats containing 16 (4bpp), 256 (8bpp)or 16.8M colors (24bpp) do not include transparency. In such cases, a 1-bit mask image in added in the image format to simulate the transparency. This is a "hard" transparency: the pixel is either fully transparent of fully opaque. There is no half transparency for these color formats.
The RGB/A (32 bpp) includes natively a transparent channel coded in 8 bits (alpha channel) resulting in 256 possible values for the transparency. This permits creating smooth or variable transparency.
What is the RGB format with Alpha Channel?
Also called RGB/A, this image format contains 16.8M colors coded in RGB plus an additional opacity channel. This channel is called the "Alpha Channel". Each channel is coded using 8 bits per pixel. As a result each pixel is coded in 32 bits (32 BPP - Bits Per Pixel). See the illustration below to understand how channels are organized in an RGB/A image.
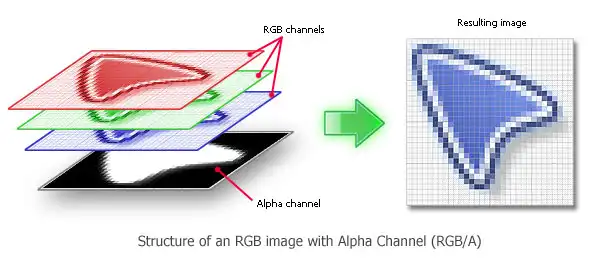
This is a new image format that you can find in new generation of cursors. This image format is called RGB/A by Axialis CursorWorkshop.
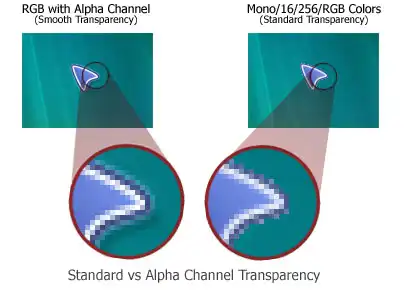
The main advantage of this image format is that it permits to display a smooth transparency in cursors. The resulting image is displayed with smooth contours on all backgrounds. It permits also to create dropped shadows behind cursors. The following illustration shows the difference between a standard pointer (in 256 color formats for example) and the new RGB/A pointer with smooth transparency:
Important
Windows static and animated cursors support RGB/A images. These cursors can be displayed in Windows Vista to 11 and in MacOS 10 or more. Older systems does not support RGB/A cursors. That's the reason why you need to include other standard formats in your cursors.
Specifications of Static Cursors
Static cursors contain several formats of the same still image. It is recommended to include several images formats of different sizes and color depth. in a static cursor to permit Windows® to choose the most appropriate format when displaying it on screen. It may change based on number of colors of the screen.
A standard Windows static cursor contains the following formats:
This is very important to create several image formats in a static cursor in order to be compatible with all screen configurations (especially if you wish to include it in an application). Axialis CursorWorkshop includes a powerful feature which permits to create new formats based on existing images in a few clicks.
Current versions of Windows only support 32x32 image formats for cursors. If you create larger or smaller images, they will be resized to 32x32 by Windows altering the quality of the resulting mouse pointer on screen. However, because of new High-DPI screens, future versions of Windows will probably support larger cursor sizes.
Important
The RGB/A image format is used under Windows XP or superior versions only. It is recommended to include a 16-color image format for compatibility with old configurations.
Static cursors are saved in files with extension .CUR.
Specifications of Animated Cursors
Animated cursors contain several images composing an animation. Each image is called a "frame". All the frames included in an animated cursor must have the same size and color depth.
Frames are displayed in sequence to produce the animation. When the last frame is displayed, the animation restarts from the begining. Each frame is is displayed during a certain period of time which can be different from one frame to another. The display duration of each frame is given in "Jiffies". One Jiffy is 1/60 of a second. For example, 0.5 second is 30 Jiffies.

![]()
Note
The RGB/A image format is used under Windows XP or superior versions only.
The animated cursors are saved in files with extension .ANI.
What is the Hot Spot?
The hot spot of a cursor is the point to which Windows refers in tracking the cursor's position. By default, the hot spot is set to the upper-left corner of the cursor (coordinates 0,0). But you can set the hot spot anywhere in the drawing area of the cursor.
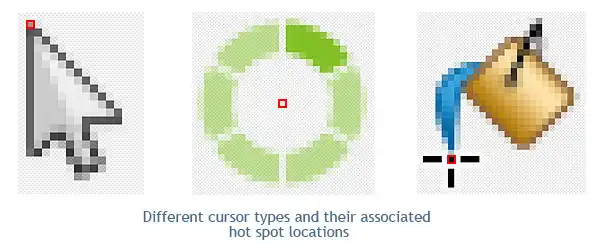
For example, arrow cursors have the hotspot located at the extremity of the arrow point. Because this is the location that the user uses naturally to point and click. For wait cursors, like a rotating object, the hotspot is usually located at the center of the cursor. For drawing tools cursors, it is located at the center of the small cross associated to the tool.
In animated cursors the hot spot location must be chosen using the same rules as static cursors. The hot spot location is the same for all the frames composing the animation.
The coordinates of the current cursor's hot spot are displayed in the status bar at the lower-right side of the main window: ![]() . In the preview 1:1 Window, the hot spot location is shown by a large cross (caret) displayed behind the cursor. This option can be set or removed by right-clicking on the preview window and choosing "Show Caret".
. In the preview 1:1 Window, the hot spot location is shown by a large cross (caret) displayed behind the cursor. This option can be set or removed by right-clicking on the preview window and choosing "Show Caret".
Setting a hot spot location in CursorWorkshop
In the editor area, the hot spot is shown as a square slowly blinking from white to black.
1. If you don't see the hot spot, activate the visualisation: choose Draw/Show Cursor Hot Spot or press Ctrl+K.
2. Select Draw/Set Cursor Hot Spot or press K. Click to the new location.
3. The new location flashes for a short moment. The new hot spot location is defined.
Can we save several cursors into one file?
Yes, you can assemble several cursors in one file called a Cursor Library. The extension for a standard Cursor Library is CUL.
Axialis CursorWorkshop fully supports CUL files. It can create, read and save CUL library files. If you manage a large number of cursors, we recommend you to store them in CUL files. CUL files are in fact 32-bit DLL files containing the cursors as resources.
You can save static or animated cursors in CUL files. A small overlay image permits to distinguish the animated cursors from the static cursors.