How To Batch-merge Icon Images
In relation to Axialis IconWorkshop, this article offers information on the following topics:
- Select the group of images to merge
- Merge the images
- Creating several illustration images for web sites
In this tutorial we'll see how to repeat the same task automatically on a large number of image. This is what we call a batch procedure. Several batch procedures are implemented in IconWorkshop. We access these features from the built-in File Browser.
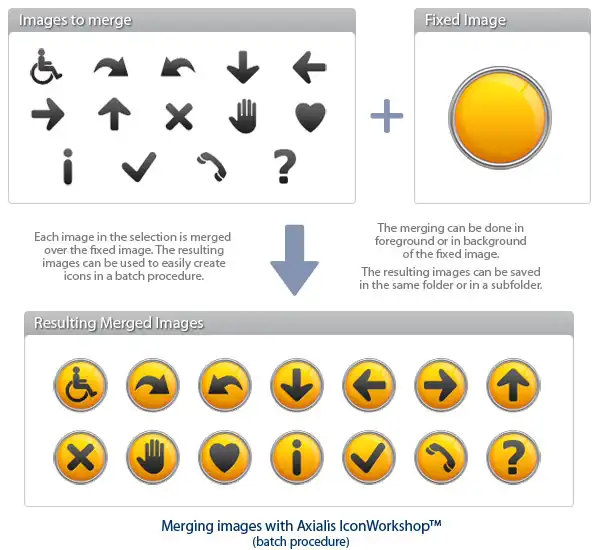
The merge feature permits creating images (PNG, PSD, BMP, GIF or JPEG2000) in one batch process by merging several source images with one single fixed image. For example, this feature is useful to create a set of icons by merging different symbols over the same background shape. You can also add the same glossy effect to a set of existing icons. The fixed image can be merged in background or in foreground:
Select the group of images to merge
1. Open a new File Browser window. Choose File/New/File Browser...
2. When the window is opened, select the folder which contains the icons using the tree in the left pane.
3. When done, the files appear (with preview) in the right pane. Select the icons files you wish to merge. You can use Shift/Ctrl + Mouse to select several files. Use Ctrl+A to select all. Use +/- to select/unselect by specifying filters.
4. Choose File Browser/Batch Merge Images.
5. A dialog box opens. In "Fixed Image" enter the full pathname of the fixed image file 1. You can also browse folder to select the file.
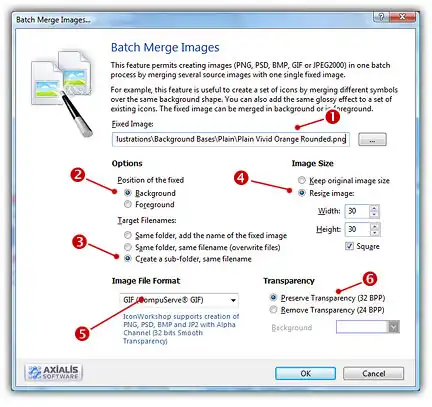
6. Select the position of the fixed image 2:
-
Background - The fixed image is placed in background and each image is merged "on top". For example, this is used to add a symbol or an overlay image over an opaque object (like in the illustration above).
-
Foreground - The fixed image is merged over each image. For example, this is used to add an effect like a glossy reflexion or a shadow on a set of icons.
7. Select the way the resulting image filenames will be generated3:
-
Same Folder, Add the Name of the Fixed Image - New files will be created in the same folder. The resulting filenames will be: "Name_of_each_image + Name_of_fixed_image + Extension". The Extension change depending of the file type you chose (5).
-
Same Folder, Same Filename - New files will be created in the same folder. The resulting filenames will be the same as the original images. Original files are overwritten.
-
Create a Subfolder, Same Filename - New files will be created in a subfolder which has the name of the fixed image. The resulting filenames will be the same as the original images.
8. If you want to resize the images during the procedure, select Resize Image 4 and specify the desired image below.
9. Select file format of the resulting files 5 and specify the transparency option 6.
10. Click OK, the batch procedure starts and all the files are created.
Axialis IconWorkshop
Create Icons using a Professional Authoring Tool
![]()

- Axialis IconWorkshop is a professional icon authoring tool for creating icons on multiple platforms and devices.
- The tool supports creating icons for Windows, macOS, Unix/Linux, Android, iPhone.
- The interface is designed to increase productivity, with easy accessibility to all tools and a powerful built-in librarian and file explorer.
- Batch processing features are included for creating multiple icons at once.
- The tool includes features such as icon creation from images and image objects to help create professional-looking icons quickly.
- The tool is compatible with industry standards and includes plugins for Adobe products and Microsoft Visual Studio.


Creating several illustration images for web sites
Using the object packs that we release on regular basis, you can create a large number of icons. Some packs, like the "Pack #5 - Web Illustration", permit creating a list of icons by merging different symbols over the same background base. This is called a "batch merging" procedure. This is useful when you must create several button icons of the same style for a web site.
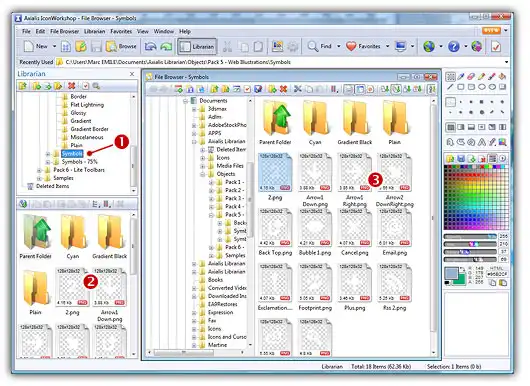
1. In the Librarian, open the folder "Objects\Pack 5 - Web Illustrations\Background Bases\Plain". Right-click on the file "Plain Vivid Orange Rounded.png" and choose Copy Pathname. This will copy the full pathname of the file in the clipboard. This is the base we'll use to create our list of symbols. We'll need this full pathname in a moment.
2. Open the folder "Objects\Pack 5 - Web Illustrations\Symbols" 1. Right-click in the file list 2 and choose Open Folder in File Browser. A new File Browser window opens, displaying the contents of the folder 3.
3. Select all the files by pressing Ctrl+A. Right click in the selection and choose Batch Merge Images (PNG, PSD, PNG, GIF). A dialog box opens:
In Fixed Image, right-click and choose Paste. The full pathname of the file we copied in step 1 is pasted 1. In Options, select Background 2 and Create a Sub-folder, same filename 3. This will place the base in background and create the new files in a subfolder. In Image Size, select Resize Image 4 and specify 30x30. In Image File Format, select GIF (compuserve) 5. The last option is Transparency 6: select Preserve transparency.
4. Click OK. A GIF optimization dialog box opens. Specify the desired options as we've seen in the previous tutorial, Click OK. The batch procedure starts.
5. When finished, a new subfolder named "Plain Vivid Orange Rounded" is created. Double click on it to show its contents. All the GIF files that have been created by the batch procedure are displayed. Here is a snapshop of the resulting images:

The full version of the Object Pack #5 - Web Illustration contains more than 205 objects in 2 sizes, 5 colors and hundreds of background bases. The possibilities are almost infinite!